Review Article - (2025) Volume 14, Issue 1
Received: 08-Nov-2023, Manuscript No. ARA-23-119617;
Editor assigned: 10-Nov-2023, Pre QC No. ARA-23-119617 (PQ);
Reviewed: 24-Nov-2023, QC No. ARA-23-119617;
Revised: 31-Jan-2025, Manuscript No. ARA-23-119617 (R);
Published:
13-Jan-2025
, DOI: 10.37421/2168-9695.2025.14.309
Citation: Sunder, Sham, Subash D and Abishekguru AM. "Software Development for Asset Management Using RFID." Adv Robot Autom 14 (2025): 309.
Copyright: © 2025 Sunder S, et al. This is an open-access article distributed under the terms of the creative commons attribution license which permits unrestricted use, distribution and reproduction in any medium, provided the original author and source are credited.
The objective of this project is to develop a software to track the presence of important assets in an industry like machines, laptops, tools, etc. using Radio Frequency Identification (RFID) and monitor the status of the assets inside an industry. The presence of the asset is detected by using the RFID technology, in which RFID tags are attached to the asset and the RFID reader will read the RFID tags and provide the presence or absence of the asset. And a database will be created where the status of the machines is uploaded periodically and any authenticated user can view the status from anywhere inside the industry, if they are connected to the industry’s Wi-Fi. The database further helps in continuous monitoring of the assets and can be used for analysis purpose too. The developed software will link the database in the backend to the User Interface (UI) on the frontend. Depending on the user, they can create, edit, delete, or see the status. The information uploaded can be in form of text or a document. The information available in the database will be segregated and displayed on the UI in a coherent way, so that it will be easy to access the required information. Also, special authentication will be provided for specific users, who will have some special rights. The user authentication system will have password encryption, so that passwords will be secure. The software will be hosted on the industry’s Local Area Network (LAN) or cloud hosting platforms depending on the industry’s requirement. In order to integrate a software with a company’s LAN, a main web server should be used and the files used for software should be configured to the main server. Then to use the software, connect the device to the main server (via Wi-Fi or LAN) and enter the IP address of the website in order to access the website. The application of this project is to provide a platform where the information about the assets can be stored and displayed in an informative way to the users. The users will be the employees working in that industry or someone who is related to that industry. Because of this, the employees can keep track of the status of the assets like machine in an effective way, provide the presence or absence of the asset in the industry, also it is easy for them to see the past records of a particular machine. In case if any new employee joins the company and he needs to operate a machine, he can easily go through the records of that machine
LAN • RFID • Software • Wi-Fi • Password • Technology
In the ever-evolving landscape of modern business operations, the management and tracking of assets stand as pivotal components of efficiency, security, and resource optimization. Asset management, across various industries, necessitates the seamless coordination of tangible and intangible resources, and as technology continues to advance, it offers innovative solutions to streamline this process. Radio Frequency Identification (RFID) technology has emerged as a powerful enabler in the realm of asset management. Through its ability to uniquely identify and track objects in real-time, RFID technology presents an opportunity for organizations to enhance their asset management practices, resulting in cost savings, improved asset utilization, and heightened security measures.
The primary aim of this paper is to present a comprehensive analysis of the software development methodologies employed in the creation of an asset management system utilizing RFID technology. By conducting an in-depth examination of this integration, we aim to highlight the technical intricacies, advantages, and potential challenges associated with this innovative approach [1]. Furthermore, through a comparative analysis with existing solutions, we intend to showcase the unique contributions and enhancements that our system brings to the field of asset management.
Hardware and software
RFID tags: RFID (Radio-Frequency Identification) tags are small electronic devices that consist of a microchip and an antenna. They are used for tracking and identifying objects or individuals wirelessly through radio waves. RFID technology is widely used in various industries and applications, including supply chain management, inventory tracking, access control systems, toll collection, and asset tracking (Figure 1).

Figure 1. RFID tag components.
RFID readers: RFID readers are devices that interact with RFID tags by emitting radio waves and receiving signals from the tags. They play a crucial role in RFID-based asset management systems. When selecting RFID readers for a Python-based asset management system, it's essential to consider factors such as frequency, read range, connectivity, and compatibility with the system's software components. Additionally, the choice of reader should align with the specific requirements of the asset tracking environment, such as the type of assets, the desired read range, and any environmental factors that may impact performances (Figure 2).

Figure 2. RFID tags and RFID reader.
Antennas: Antennas are an integral part of RFID systems, working in conjunction with RFID readers to facilitate communication with RFID tags. They play a crucial role in transmitting and receiving radio waves to exchange data between the reader and the tags. When selecting RFID antennas, it's essential to consider factors such as frequency compatibility, gain, beam width, and integration options. Proper antenna selection and placement are crucial to achieve reliable and efficient tag reading in an RFID-based asset management system.
Network infrastructure: Network infrastructure is basically nothing but it is the layout of the connected or integrated hardware and the software components of the system if basically make sure the creation of the computer network [2]. The components that were included in the network infrastructure was the cables, servers and some other form of components that enables the data flow between two points. A good infrastructure is very important for proper flow and communication of the data (Figure 3).

Figure 3. RFID system components.
Database server: A database server is a computer related application that basically stores and manage all the database within the system. It basically makes the data accessible for the users. It plays an important part in various applications like websites, business models etc. (Figure 4).
Some common database server’s models are:
• MySQL
• PostgreSQL
• MicrosoftSQL

Figure 4. Database servers.
Django: Django is nothing but it is a high-level open-source web framework. It mostly used in the process of making web applications. It provides a set of tools and in build libraries for common web applications tasks. Also, it provides the automatic admin interface for managing the various applications data model.
Bootstrap: It is open-source frond end framework. It basically eases the process of generating the response and make attractive websites and applications attractive. It was develop by Twitter but now manages by open source community. It provides the inbuilt HTML, CSS and JAVASCRIPT components. Apart from that it provides a wide range of UI components like buttons, forms etc.
SQLLITE3: So, it is a lightweight embedded relational database management system. It is designed in a way in order to deal with the local data storage and mostly it is used in mobile apps, and small level systems where fully-fledged high-end data base is not necessarily important.
Integration of RFID and ARDUNIO
RC 522 RFID reader is used for tag reading purposes. RC522 RFID Sensor has 8 pins.
• VCC (3.3V): Connect the VCC pin to the 3.3V pin of the Arduino. Connecting it to the 5v Arduino pin can destroy the RFID module.
• RST: This pin is for resetting the module.
• GND: This pin connects to the GND pin of Arduino.
• IRQ: This is blocking or interrupt pin that can alert the microcontroller when it comes around the RFID tag.
• MISO/SCL/TX: This pin is Master-In-Slave-Out. It acts as serial data output and connects to the Arduino RX pin.
• MOSI: Master-Out-Slave-In pin is SPI input to the RC522 module.
• SCK: Serial Clock is accepting clock pulses provided by Arduino.
• SS/SDA/Rx: When the SPI interface is enabled it acts like Signal input when the I2C interface is enabled it acts like Serial data and acts as Serial data input when the UART interface is enabled. This pin usually connects to the Arduino TX pin (Figure 5).

Figure 5. Pin out diagram of RC522 reader.
The connection between Arduino UNO and RC522 RFID reader is given Figure 6 below:

Figure 6. Connection between RFID reader and ARDIUNO.
The connection Table 1 between Arduino UNO and RC522 is given below.
| RC522 | ARDUINO |
|---|---|
| SDA | Digital 10 |
| SCK | Digital 13 |
| MOSI | Digital 11 |
| MISO | Digital 12 |
| IRQ | --unconnected-- |
| GND | Gnd |
| RST | Digital 5 |
| 3.3 V | 3.3 v |
Table 1. The connection between Arduino UNO and RC522.
The packages used for integrating Arduino and RFID readers are:
• MFRC522.h: The MFRC522 library is a software library for Arduino that provides a set of functions and methods for interfacing with the MFRC522 RFID reader module. This library simplifies the process of reading RFID cards and interacting with the MFRC522 module.
• SPI.h: SPI.h is a header file in the Arduino library that provides an interface for Serial Peripheral Interface (SPI) communication. SPI is a widely used synchronous serial communication protocol that allows multiple devices to communicate with each other using a master-slave architecture. The key commands of MFRC522.h packages are:
• PCD_Init(): This sets up the module for communication and prepares it for card detection.
• PICC_IsNewCardPresent (): Checks if a new card is present within the reader’s range.
• PICC_ReadCardSerial (): Reads the card’s UID and other data.
Initially the packages are imported and the baud rate is fixed between the RFID reader and Arduino. After that once the RFID reader is turned ON to scan the tags. If any new tag’s presence is determined, then the UID of that tags is determined using PICC_ReadCardSerial () command and UID of the tag is printed. Each product will be assigned to different RFID tag and different UID. Based upon the specific UID, the data of that product can be displayed.
The reader will be turned on periodically for a time period around 1 minute and waits for any RFID tags to scan. After one minute, all the tags with their product details will be displayed on the output screen. If no RFID tags are scanned during the scanning time, then empty list will be displayed on the screen signifying that no tags are scanned.
Design
The steps in creating in creating a website are:
• Setting up a Django project.
• Setting up the various apps.
• Defining models.
• Creating views and templates.
• Configuring URL routing.
• Testing and debugging the developed website.
• Deploying the website.
The website has user authentication functionality, so the employees of PRICOL can sign up, login and logout of the website as needed. The website is comprised of a number of webpages including a login page, a signup page, a machines page, a status page, a documents page, a new-status page, scan page and a scan history page. Also, every page will have provisions to navigate to other pages. Also, the navigation bar will have links to all the main webpages [3]. The RFID will be linked to python inorder to get the required data and then the data from the python will be stored to a database. Then from the database, the data will be extracted and displayed on the website using Django. In order the access the webpage only in the main host/ main server device, use the command python manage.py runserver
The various webpages of the created Django website are given below (Figure 7):

Figure 7. Starting page.
Here the user can either log in with the existing username and password or can sign up with new username and password (Figure 8).

Figure 8. Login page.
This is the starting of the website, where the user is asked to login before accessing the information, view the status of the machines or upload any status to the website. The user should the details like username and password to log in. In case of incorrect username or password, the user is notified that any one of the credentials is incorrect and the user is again is asked to log in using his authorized credentials. If a new user wants to access the webpage, before logging in, the new user must sign up for new account (Figure 9).

Figure 9. Signup page.
In case of new user accessing the website, the user must sign up before logging into website. Unique username is required for all users. Further in the password, a continuous sequence of common letters can be formed as password and password must contain a number and symbol. If a user failed to create a password without a number or a symbol, the account is not created. The user must create a unique user and password in order create an account (Figure 10).

Figure 10. Home page.
Once the user’s account is created and logged in the website, the main home page appears. In home page, all machines are listed. The user can select the machine and status of the machine can be viewed. Here for example, two machines have been selected, they are Fanuc 100ic and ABB limb200. The machine’s list can be increased if necessary. If the user clicks on any one of the machines, then status is appeared in separate webpage [4]. If the user wants to view status of another machine, then the user go back to the home page and select the machine, which the user wants to view the required machine’s status (Figure 11).

Figure 11. Machine-details page.
Here the uploaded status of the machine is viewed. The user can check the status and working of each machine. Figure 11 represents the machine details of Fanuc 100ic. All the previous status of the machine can be viewed by the user. The user can add new status regarding the machine in the new status page (Figure 12).

Figure 12. Status page.
The user can view the overall status of the machines available in the plant. Status of each machine can be seen by the user. All the positive status is described with a green color text, whereas all the negative status are described with red color. The user can see the description of the status, so that the user can have a better understanding regarding the machine status. The user can view the documents uploaded in the status for reference (Figure 13).

Figure 13. Documents page.
The user can view all the documents upload in the website. The user can view the document of the required machine to be seen and the date and time of the document uploaded is also given in the webpage for easy access of the user. The document can be in pdf or word, image or video (Figure 14). The document can be used as reference material when a new user is using a machine for the first time and the user can refer to the document while working with the machine. The document can store information about the machine, such as maintenance file, issues file etc. [5].

Figure 14. New status page.
The user can upload a new status of the machine by selecting the machine whose status is needed to update, here the machine can be either Fanuc 100ic or ABB limb200. After selecting the machine, the user must mention whether the machine is working or not, meaning whether the machine is facing any issues or not or whether the issue ahs been fixed or not etc. Then the user can add a brief description regarding the new status. The user can explain about the issues faced in the machine so that it will be easy for other users/workers for repairing the machine and also while using the machine (Figure 15).

Figure 15. Scan page.
This page is used for scanning the RFID tag. Once the scan button is pressed, the scanning of tags starts for a time period of ten seconds. In this time period the reader can scan as many tags are read by the reader and displays the information on scan history webpage. If the user wants to scan the tags again, the user must click on the scan button in Figure 15.
In this page, the scanned RFID tags are displayed in the webpage. The RFID tags are attached to tools or products to track it’s mobility in the industry. This page provides information on the RFID tag’s UID. If more than one tags is scanned during the scanning period, then UID of all the tags are displayed in a list (Figure 16). The list is displayed along with date and time of the scanning so that the users can have easy understanding about the mobility of the product and the tools.

Figure 16. Scan history page.
This webpage is the main admin page of the website, where the data can be manipulated. All user can’t access to this page, only the main admin or main supervisor can access this page. The main admin can manipulate the data such as creating new status, deleting existing status, remove existing users and adding new user, etc.
With the help of this admin page, the whole process can be monitored and supervised by the admin easily. Two admins can be created for this admin webpage (Figure 17).

Figure 17. Admin page.
Implementaton
The backend of the software has been developed using Django and python. Arduino UNO is used to detect the presence of RFID tags. Therefore, Arduino is interfaced with python and then integrated with Django.
Django: First download Django package, install the Django and create new project. Once a new project is created, create app in the new project. Once these steps are completed, customize the files accordingly to create the website. A Django project should have all the necessary files and folders in their respective locations in order to function properly [6]. If you create a Django project, all the required items will be created with it (Figure 18).

Figure 18. Django project Folder.
The Django project folder contains:
• The media folder will have all the pictures, documents, etc. that are required for hosting the website.
• The pricolweb folder has all the project level files such as settings, wsgi, asgi, etc.
• The static folder will have all the CSS and JavaScript files.
• The status folder is the djangoapp that has all the required files to execute the process.
• The templates folder will have all the HTML templates.
• The db.sqlite3 file is the database file for the website.
• The manage.py file contains functions for all the basic website tasks such as creating a superuser, running the server, etc.
The settings.py and urls.py of the pricolweb folder has to be updated according to our specifications. Other than that, all the other files remain same (Figure 19).
The status folder contains all the important files:

Figure 19. Djangoapp folder.
In Django project, the main file are:
Models: Models is used for creating database, storing information.
Views: View is used to assign the functionality of each webpage.
Templates: Templates contains the HTML, so if the template is rendered the HTML file can be obtained. For each webpage, new template file is created.
The admin file contains all the functions related to the admin-page of the website: The required models have been imported from models.py and they are registered, so that the admin has access to them.
The models.py contains all the database schema for the website: In model.py three models have been created, they are Machine, Scan and Status. The Machine model will have two fields, name and manufactured_year. The Status model will have six fields, whereas the scan model will also have two fields.
The views.py file will link the database models and HTML templates. For all the webpages, there should be a view-class. Depending on the view-class, the attributes of the class will change. Generic class-based views are used for this website
The urls.py will link urls and views: url provide path and view provide functionality, these both combined are called controller, All the views are linked with an url. We also name the url inorder to use that in the templates.
The utils.py file contains all the required python functions.
In settings.py and admin.py files, small customization is required in the file according the application, like allowing other host to access the website and having two main admin for the website.
HTML templates and CSS files
In order to obtain CSS file, base.css file is added in the each template file. In the template, the basic layout of the webpage is created using bootstrap. For each webpage, basic layout is created using bootstrap [7].
In this application, many html files have created, they are:
• base.html: In this html file, it displays the startup webpage (Figure 7) and login and signup webpage (Figures 8 and 9).
• home.html: In this file, the machines are listed (Figure 10).
• machine_detail.html: In this file, the status of the machine can be viewed, like whether the machine is working or not, description of the machine and document uploaded to the machine (Figure 11).
• status.html: In this file, the overall of all the machines can be viewed (Figure 12).
• documents_view.html: In this file, the user can view all the documents uploaded (Figure 13).
• new.html: In this file, new status of a machine is updated by the user. The user can select the machine, state whether the machine is working or not, type some description and can upload the document if any (Figure 14).
• scan.html: In this file, the user can scan the surrounding for any presence of RFID tags (Figure 15).
• history.html: In this file, the user can view the RFID tags scanned with timestamp (Figure 16).
Hosting the website
The website is hosted to local area network via Wi-Fi. In order to host the website, in setting.py, in the ALLOWED HOSTS, place * in the list, this allows other devices to use the website.
Next, in the command prompt, run the website with the command:
Python manage.py runserver 0.0.0.0:8000
0.0.0.0 acts like and special IP address, it signifies that any other computer can be connected the main host and can access the website and 8000 is the port at which the website can be accessed. Now open a new command prompt and type ipconfig to display the configuration data. In the data given below, look for the Wireless LAN adapter Wi-Fi and note IPv4 address. Now in the main host, create a firewall rule type, select port as the rule type, and give the specific local port as 8000 and create the inbound rule.
Now connected the other devices and the main host to common Wi-Fi and other devices can access the website by entering the IPv4 address followed by the port number [8].
In conclusion, leveraging Django to create a website for asset management with RFID technology integration offers a powerful and versatile solution for organizations seeking to streamline their asset tracking and management processes. This approach provides efficient, real-time tracking capabilities, allowing for accurate monitoring of product locations and statuses. The customization options inherent in Django empower organizations to tailor the system to their unique requirements. With a user-friendly interface and scalability, it suits a wide range of businesses. The security features ensure data protection, while data like machine status and related documents and report enables as valuable insights. Furthermore, seamless integration and compliance capabilities make it a comprehensive asset management solution. While there may be an initial investment, the long-term benefits in terms of efficiency, cost savings, and data-driven decision-making make Django and RFID technology a worthwhile investment for efficient asset management.
[Crossref] [Google Scholar] [PubMed]
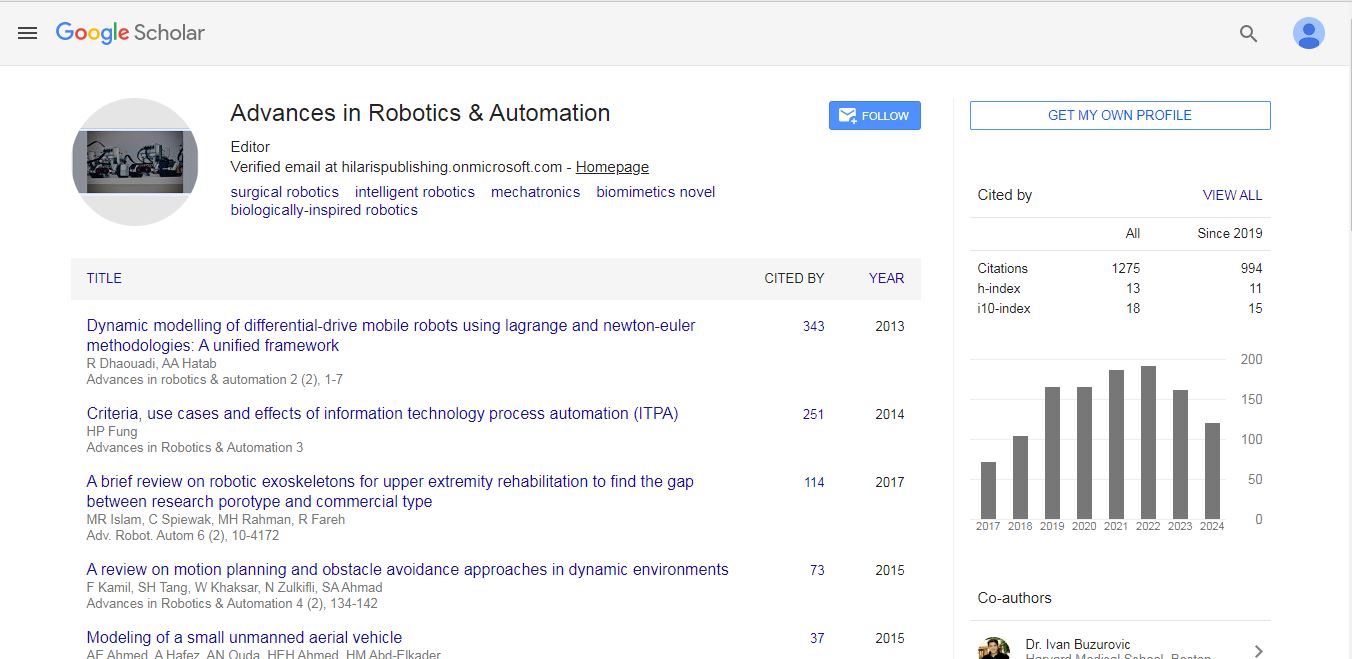
Advances in Robotics & Automation received 1275 citations as per Google Scholar report